In Michigan it looks as if spring is here to stay. We decided to do a bit of spring cleaning to make room for our expanding veneer inventory. Over the next few weeks we'll be adding a bunch of new and exotic wood veneer species to our stock. As we made some room on our shelves for the incoming stock, we found some unique veneers. These veneers are mostly over runs from custom orders and include heavily figured, special sized, or overstocked species. There is some great birdseye maple and ropey cherry veneer as well as some undersized 2’ x 4’ PSA (pressure sensitive adhesive) various species veneers. Take a look below and see if you find anything you might need. You can use the linked index to go straight to the species or just scroll down the page and browse. Quantities are very limited and offers are good only while supplies last. Don’t hesitate to give us a call or email if you have any questions.
Featured Items Index
Click The Link To Go Directly To The Item
3' x 102" High Figure Birdseye Maple
4' x 102" High Figured Curly Maple
High Figure Ropey Cherry
Light Figure Walnut
Speckled Alder
Heavy Figure Ropey Cherry 10'
Flat Cut Teak
Also Available Sale Items
Please Call Us To Order: 586.825.2387
4' x 8' Seq. Rift White Oak 10mil (seq. of 8 & 6) @ $2.50 / sf
4' x 7' Comb Grain rift White Oak 10mil @ $2.39 / sf
4' x 8' F/C Mahogany 20mil @ $1.39 / sf
4' x 8' Utility Grade F/C Cherry 10mil @ $.99 / sf or 20mil @ $1.25 / sf
2' x 4' Assorted species w/ PSA @ $20.00 ea.
 |
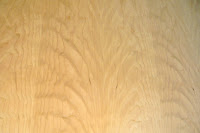
High Figure Birdseye Maple
3’ x 102" FlexVen™10 (10 mil) paper backed veneer
$9.89 sq. ft.
5 sheets available on white paper
This high figure premium birdseye maple veneer has a consistent prominent birds eye figure and is perfect for smaller projects or accent pieces. All sheets are sequenced, consistently figured and devoid of any dark mineral steaks or worm tracks.
$9.89 sq. ft.
5 sheets available on white paper
This high figure premium birdseye maple veneer has a consistent prominent birds eye figure and is perfect for smaller projects or accent pieces. All sheets are sequenced, consistently figured and devoid of any dark mineral steaks or worm tracks.


 |
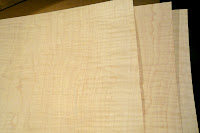
High Figured Curly Maple
4’ x 102" FlexVen™10 (10 mil) paper backed veneer
$5.49 sq. ft.
3 sheets available on white paper
This high figure premium curly maple veneer has a consistent prominent curl and is perfect for smaller projects or accent pieces. All sheets are sequenced.
$5.49 sq. ft.
3 sheets available on white paper
This high figure premium curly maple veneer has a consistent prominent curl and is perfect for smaller projects or accent pieces. All sheets are sequenced.


 |
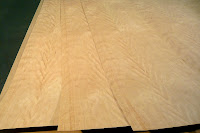
High Figure Ropey Cherry
4’ x 8’ FlexVen™20 (20 mil) paper backed veneer
$3.99 sq. ft.
3 sheets available
This highly figured flat cut ropey cherry veneer has a consistent figure and is perfect for medium sized projects or accent pieces. All sheets are sequenced.
$3.99 sq. ft.
3 sheets available
This highly figured flat cut ropey cherry veneer has a consistent figure and is perfect for medium sized projects or accent pieces. All sheets are sequenced.


 |
Light Figure Walnut
4’ x 8’ FlexVen™10 (10 mil) paper backed veneer
$2.49 sq. ft.
7 sheets available
This lightly figured flat cut walnut veneer has a slight figure running through its wide flitches and is perfect for larger projects or wall panels. All sheets are sequenced.
$2.49 sq. ft.
7 sheets available
This lightly figured flat cut walnut veneer has a slight figure running through its wide flitches and is perfect for larger projects or wall panels. All sheets are sequenced.


 |
Speckled Alder
4’ x 8’ FlexVen™10 (10 mil) paper backed veneer
$3.29 sq. ft.
17 sheets available
This flat cut alder veneer has a consistent speckled figure running through its wide flitches that is created by worms tracks and vine marks. This is perfect for larger projects or wall panels. All sheets are sequenced.
$3.29 sq. ft.
17 sheets available
This flat cut alder veneer has a consistent speckled figure running through its wide flitches that is created by worms tracks and vine marks. This is perfect for larger projects or wall panels. All sheets are sequenced.


 |
Heavy Figure Ropey Cherry 10'
4’ x 10’ FlexVen™10 (10 mil) paper backed veneer
$4.29 sq. ft.
2 sheets available
This highly figured flat cut ropey cherry veneer has a consistent figure and is perfect for medium sized projects or accent pieces. These sheets are not sequenced.
$4.29 sq. ft.
2 sheets available
This highly figured flat cut ropey cherry veneer has a consistent figure and is perfect for medium sized projects or accent pieces. These sheets are not sequenced.


 |
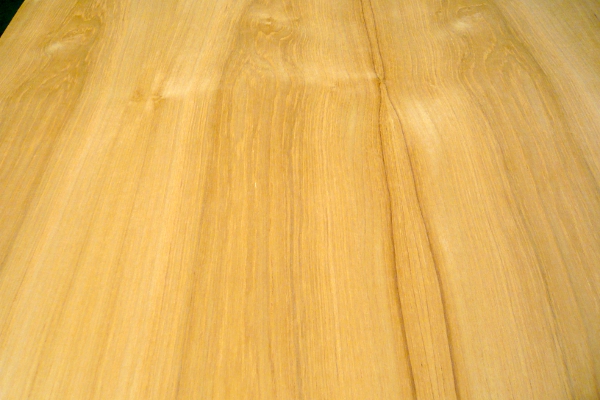
Flat Cut Teak
4’ x 8’ Pli-Flex™ (w.o.w.) wood on wood backed veneer
$3.79 sq. ft.
various quantity of sheets available
This wood on wood flat cut teak veneer is available in various sequences. Sequence sizes range form 2 sheets to 4 sheets or more.
$3.79 sq. ft.
various quantity of sheets available
This wood on wood flat cut teak veneer is available in various sequences. Sequence sizes range form 2 sheets to 4 sheets or more.